Showing posts with label Nicole. Show all posts

Monday, March 7, 2011

P-Dub & Apple Dumplings

Affiliate links may be included in this blog post. If you purchase from the link provided, a small commission is earned at no cost to you. Thank you.

Have you heard of the Pioneer Woman, Ree Drummond? I guess a better question is, who hasn't heard of her? The Pioneer Woman is an amazing food blogger who partially inspired the creation of the Sasquatch Willow blog. She's like the Wonder Woman blogger of the Midwest

It's no surprise that when we found out she was having a book signing not so far away, (a bit of an understatement there, it was a four hour drive) we knew we had to go!

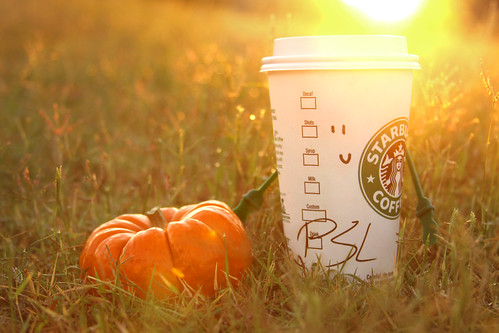
So, we began our pilgrimage. We managed to avoid a traffic jam. Saw a dead horse. Cried about the dead horse. Became turned around in the Ohio State medical area. Saw a giant coffee cup. Stopped at Tim Horton's. And watched a kid devour a cupcake

Finally, we met the Pioneer Woman aka P-Dub. 


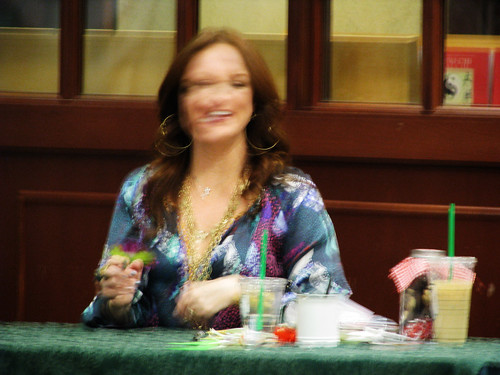
Let's not look at this like a bad photo. Let's look at it as an artistic expression of P-Dub's Wonder Woman-ness.

After the books were signed and small pleasantries exchanged, we headed off to dinner at a place called The Old Mohawk. 

What did I learn through all of this? 
  1. The Pioneer Woman aka P-Dub aka Ree Drummond is even nicer in person than she seems on her blog.
  2. I'm not very good at the book signing small talk thing. I should probably work on that.
  3. Food places with crazy names are always the best (Stop by The Old Mohawk if you happen to be in the German Village area of Columbus, Ohio.)
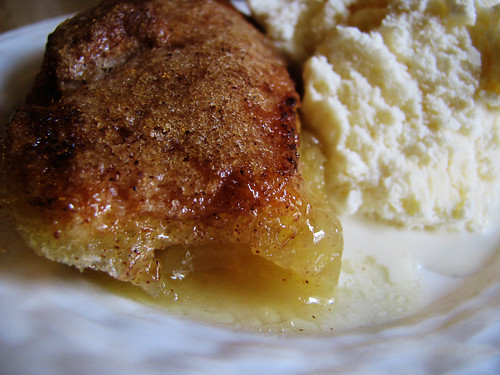
This wouldn't be a proper blog post without a recipe of some sort, so I decided to test out P-Dub's recipe for Apple Dumplings. These really couldn't be any easier unless someone else made them for you.


Easy Peasy Apple Dumplings
Yields: 24 Dumplings 

Ingredients:
3 Granny Smith Apples
3 cans of crescent roll dough
1 cup (2 sticks) of butter (salted)
1 cup of granulated sugar
2/3 cup of brown sugar
1 teaspoon vanilla
1 teaspoon + 3 tablespoons of cinnamon 
1 - 20 ounce bottle of Mountain Dew (not diet)

Prep:
Preheat your oven to 350*F. Grease a large pan for the dumplings. Peel and core your apples, cutting each of them into 8 slices. Unroll your crescent dough and separate the "triangles". 

Roll up an apple slice in triangle of dough and place into your pan. Make sure to avoid crowding the dumplings in the pan, otherwise they won't be able to expand while baking. 

Melt the butter in a small saucepan. Add the sugar, brown sugar, vanilla, and one teaspoon of cinnamon. Give it a couple of stirs but don't worry about the lumps. Pour mixture over each of the dumplings and into your pan. 

Pour Mountain Dew around the perimeter of the pan until it's about 2/3 of the way up the sides of the pan. I only used about 3/4 (15 ounces) of the bottle. Sprinkle the remaining cinnamon over the top of the dumplings and put your pan in the oven. Bake dumplings for 30-45 minutes, until they are light brown and crispy on the top.

Tips:
I made a lot of dumplings with this recipe, but you can change it to your liking. Just remember that one apple + one can of crescent rolls equals 8 dumplings. Adjust down the rest of the recipe accordingly.

Also, for lactose tolerant folks out there, serve it with vanilla ice cream. It's ahhhhmazing.

Recipe adapted from the Pioneer Woman.

Monday, February 14, 2011

Happy Valentine's Day!

Have a great day whether you are single or have someone special to celebrate with.

Go out with friends, or out to dinner with the one/s you love. Print some valentine days cards out if you don't have time to get to the store or if you forgot!

Enjoy your day! Celebrate all the love you have in your life, be it a husband, wife, boyfriend, girlfriend, friends, parents, or kids.


If all else fails and you get ditched, dumped, or simply don't have a valentine, go to the store and buy some candy, it's on sale by now. 

And remember, Sasquatch loves you!


Monday, January 3, 2011

Bento love

Maybe it's because I like cute things or because I'll always be a kid at heart, but I love bento lunches. Seriously, how awesome is this?

Via
Bentos originated in Japan as a packaged, single-serving meal. Since then, they have evolved into some pretty sweet looking meals of art. I mean, hello? Rice pandas for lunch? I'm so in.

Via
Cute almost always wins for me. Domo equals a double win.

Via

Now, who wants to make me a bento lunch?

Saturday, December 25, 2010

Merry Christmas!

Hope you are enjoying a nice day with family and friends!

Remember, Sleep in tomorrow! And eats lots of left overs!


Katie, Kay & Nicole

Sunday, December 12, 2010

Baking Tip List - Cookie Week

The final recipe for Cookie Week has been posted, but we're not done yet! We've compiled a few baking tips to help you in the kitchen this holiday season.


1. Out of powdered sugar? You can can make your own if you don't want to brave the stores. Just put regular, granulated, sugar 1/2 a cup at a time in a food processor or coffee grinder and pulse until you have powdered sugar. Voila!


2. If you’re like me, you forget to take the butter out of the fridge for softened butter in recipes. Cut butter into even chunks and microwave on low for 10 seconds. Check the butter and repeat if necessary, be careful to not let it melt. Properly softened butter is the secret to many a good cookie recipe!


3. If you have multiple pans in the oven, do not let them touch. It can create hot spots and the touching spots might over cook.


4. When melting chocolate for dipping or coating, WATER IS EVIL. It will cause the chocolate to separate and that is a terrible thing. Also white chocolate is more prone to burning, so watch the temperature.


5. When I have a lot of chocolate dipping I need to do, like if I am making cake balls, dipping fruit or other food, I use a mini crock-pot for melting. It’s the perfect size, and it keeps a constant temperature.


6. Coat candy or fruit with flour before putting into batter. It will keep them from sinking to the bottom of the cake or cookie.


7. When baking cookies, it's important that they are all the same size to ensure even cooking. For drop cookies, use an ice cream scoop or cookie scoop, like this one, to take the guess work out of evenly sized cookies. (Hint: Do the same thing for cupcakes & muffins!)


8. If a cookie recipe isn't as soft or crisp as you'd like, adjust the baking time. Pulling the cookies out of the oven when the centers are still a little gooey will give you a softer cookie. Leave them in longer if you like more of a crunch (but not so long that they burn!) Also, you can make a cookie softer by swapping in a little light brown sugar for regular, granulated sugar. 


9. Parchment paper makes clean up a breeze. I use it all the time instead of greasing my baking sheet!


And the most important baking tip...
10. Turn the oven off after you're finished baking. We don't want any fires now, do we?


Do you have any baking tips to share? Post them in the comment section!

Wednesday, December 8, 2010

Salted Caramel Cocoa Cookies

Have you had the Salted Caramel Hot Chocolate from Starbucks? Don't dismiss this drink for its trendiness, it's one of my very favorite things this season. I love it so much that I decided to model a cookie recipe after it. I give you the Salted Caramel Cocoa cookie!


Salted Caramel Cocoa Cookies
Yields approx. 3 dozen cookies

1 1/4 cups (2 1/2 sticks) unsalted butter, room temp
2 cups sugar
2 eggs
1 1/2 teaspoons vanilla
2 1/2 cups flour
3/4 cup unsweetened cocoa powder
1/2 teaspoon regular salt
1 teaspoon baking soda
1 bag of Rolos chocolate caramel candies
3 tablespoons coarse sea salt

Preheat your oven to 350*. In a small bowl, sift together the flour, cocoa powder, regular salt, and baking soda. In a separate bowl cream together the butter and sugar. Add in the eggs one at a time, and stir in the vanilla. Slowly mix in your sifted, dry ingredients until just combined. 

Drop the dough by tablespoonful, roughly two inches apart, on a parchment covered baking sheet. Using your fingers, or the back of a spoon, press down on the top of an unwrapped Rolo until lightly squished* (Yes, that's such a scientific term..) Place a squished Rolo on the top of each round of dough and press down. Sprinkle a dash of the coarse sea salt on top of the Rolo.

Bake at 350* for 8 minutes. Allow cookies to cool on a rack before eating. 

Note: I recommend allowing the cookies to cool completely before taking a bite, no matter how delicious they smell. The caramel will be hot and may burn.

Adapted from All Recipes

Have you enjoyed this week's recipes so far? What's your all time favorite cookie to eat during the holidays?

xo Nicole

Monday, December 6, 2010

Molasses Drop Cookies


If you're like me, the smell of molasses makes you queasy. Don't be fooled though, these cookies are delicious!
The molasses cookies are a sweet alternative to gingerbread if you just don't have the time to roll out a ton of dough. They pair especially well with a hot apple cider. Perfect for a snowy day!

This particular recipe was adapted from the recipe of a family friend, Aunt Paula. Thanks to her for sharing such a great recipe!

Molasses Drop Cookies
Yields: approx. 3 dozen cookies

Ingredients: 
2 c. flour
1 1/2 tsp. baking powder
1/2 tsp. salt
1/4 tsp. baking powder
1 tsp. ground ginger
1 tsp. cinnamon

1/2 c. shortening
1/4 c. sugar
1 egg
1/4 c. milk
3/4 c. molasses (unsulphered) 

Preheat your oven at 350 degrees. Sift together the flour, baking powder, salt, baking soda, ginger and cinnamon in a bowl and set aside.
Cream together the shortening and sugar. Then, stir in the egg. Add in the milk and molasses.
Mix in the dry ingredients. Drop by the tablespoonful on a greased or non-stick cookie sheet. (I line my cookie sheet with parchment paper.)
Bake for 12 minutes or until lightly brown around the edges. Let cool on the cooling rack.

Tip: For a crunchy top to the cookie, sprinkle a little sugar on the rounds before baking.

Monday, November 8, 2010

Pumpkin Spice Latte

Tis the season for Pumpkin Spice Lattes!

One of my favorite parts of autumn is sipping on a Pumpkin Spice Latte. I almost wish that my favorite coffee shops would serve them year round, but then they wouldn't seem so special.

It appears I'm in good company with a couple of lovely bloggers who love Pumpkin Spice just as much as I do!

Amanda, of Vintage Dutch Girl, made the prettiest little printable Keep Calm, Drink A Pumpkin Spice Latte. Clever, right? I will be printing one of these out to hang on my wall a.s.a.p.! You can download the pumpkin spice loving printable here on Vintage Dutch Girl.

Vintage Dutch Girl

Mollie Johanson of Wild Olive designed this embroidery pattern showcasing a love for Pumpkin Spice Lattes. I can't wait to sew this one for myself! You can download the pattern over at Whip Up.

Wild Olive

Today also happens to be National Cappuccino Day, but I think we should all celebrate it with a nice pumpkin spice latte. Who comes up with these holidays anyway? Can I declare tomorrow National Brownie Day? Enjoy the pumpkin spice!

xo. Nicole

Tuesday, November 2, 2010

Jell-O

Bill Cosby loves it. Horses hate it. But me? It made me puke.

Via
As a child, the mere sight of Jell-O made me sick. Who wants to look at something so transparent and jiggly? Shouldn't food have enough substance that it doesn't look like your strange uncle who's had one too many beers and is now trying to dance on the kitchen counter at Thanksgiving? Yeah, I thought so too.

My parents forwent the popular treat during the 80s. My grandmother pushed the ever popular Jell-O molds at family dinners to the back of the table where I couldn't see. The adults went to extreme measures to keep jell-o out of my line of sight.

Via
They weren't always so quick on the draw though. As a young child, I spent some time in the hospital. What do they like to serve you while you're in the hospital? Jell-O. My family warned against it to the nurse, but when she brought out that lunch tray, there was a big piece of the wiggly stuff in front of me. As she removed the lid, it jiggled just a bit and I threw up the breakfast that I didn't eat. Well, they tried to tell her.

To the Jell-O representative currently freaking out, my opinion has since changed, so relax. You do remember Jell-O shots, don't you?

Via
Do you have a funny food story? I'd love to hear about it in the comments!

xo Nicole

Friday, October 29, 2010

Candy Corn Sugar Cookies

Tomorrow is National Candy Corn Day! Or so, that's what the internet says. Confession though, I do not like candy corn.

There, I said it. Candy corn lovers, shun me now. I do, however, think candy corn is super cute, so I decided to celebrate the holiday in another way; with cookies.


Candy Corn Sugar Cookies
Recipe adapted from here
Yields 4 dozen cookies

2 cups of powdered sugar
2 cups of butter, room temperature
1 tsp. vanilla 
5 cups of flour
Orange & yellow food coloring gel

Mix the powdered sugar, butter, and vanilla thoroughly together. Slowly add the flour to the mixture. Divide your dough into three bowls evenly. Mix orange food coloring into one bowl of dough and yellow into another. I start out with just a little amount of gel on the end of a toothpick and keep adding it in small amounts until I achieve the right color. 

Put your dough in the fridge to chill for 20 minutes. Form each bowl of dough evenly into rectangular shaped logs. Then stack the logs on top of each other and use your hands to mold it into a long pyramid of triangle shape. Wrap your pyramid with wax paper or parchment paper and freeze for several hours. 

Preheat your oven to 400* when you're ready for baking. Slice the log into pieces about 1/4 inch thick and bake in the oven for 8-10 minutes or until the edges of the cookies start to brown. These cookies will burn easily, so keep an eye on them.

Then, you'll have some super cute (non-waxy) cookies to enjoy!

Sunday, October 24, 2010

Roasted Pumpkin Seeds

Have you carved the obligatory pumpkins for the season? If not, chances are good that you will be doing just that in the next few days. Here's a photo of one that my nephew carved this year.

Tip: If you haven't carved a pumpkin before, or if you're still trying to carve with your kitchen knife, Stop. Just stop. Then run to Target and pick up one of those pumpkin carving kits. They're cheap and the little saw that's included may save a finger or two.


I'm a huge fan of carving pumpkins. What I am not a fan of is the squishy, ewey, gooey, guts-feeling part where you have to scrape and pull the pumpkin innards out. It's kind of gross. Okay, a little more than kind of. Usually, after all of that hard work, I just throw them out in the garden. 


This year, I decided to make all of the pumpkin guts worth it and make roasted pumpkin seeds. Believe me, they seem easy to make after you spend oodles of time pulling them out of the pumpkin.

Recipe: Roasted Pumpkin Seeds
2 cups of seeds (from the guts of approximately 2 pumpkins depending on size)
2 tbsp. salt (divided into 1 tbsp. + 1 tbsp.)
1/4 cup butter, melted
1 tsp. garlic powder
 
First, you have to sort through your pumpkin guts to separate out the pumpkin seeds from the gooey mess. This is easiest to do right after you've carved your pumpkins. Then give the seeds a good rinse with water.
Next, you'll want to boil your pumpkin seeds in salt water (using 1 tbsp. of salt) for 20 minutes. The pumpkin seeds should look gray when you pull them out of the water (as seen in the photo above).

Once you've boiled and drained your seeds, pour them out on a baking sheet (preferably with sides to prevent them from spilling over) and place them in a safe place to dry overnight. We don't want robbers, cats, or flies to mess with them. 
The next day, your seeds should be mostly dry to the touch. Preheat your oven to 300*F. 
Then, mix the garlic powder with the butter and pour the mixture over the seeds. Toss to coat and pour your seeds out onto the baking sheet. I lined mine with parchment paper for easy cleanup. Sprinkle the rest of your salt over the seeds.
Bake your seeds at 300* for 90 minutes or until they turn a nice golden brown. Stir the seeds up on the pan every half hour so they bake evenly.

Pour into a pretty bowl and enjoy!

I think these would also be good if you flavored with with cinnamon and nutmeg. Pumpkin pie flavored pumpkin seeds. That would be interesting.

I would love to see photos of your carved pumpkins! Link them up in the comment section.

xo Nicole

Friday, October 22, 2010

Cookies & Creme Cupcakes

To say I like cupcakes would be a huge understatement. I love-love-love cupcakes! They are sweet, miniature cakes made with the individual in mind, that leave you feeling just a little more special. Granted, they are not at all figure friendly but they're so darn cute.

I think one of the reasons I love cupcakes so much is because they are so versatile. You can take any flavor and make it into a cupcake. After having some Oreo ice cream (during the way too hot Indiana autumn), I was inspired to make some cupcakes with Oreos. 
The recipe is fairly simple with a white cake recipe adding in some Oreos. The hardest part of this recipe is deciding how you are going to chop the Oreos for your batter. You could chop them up finely and leave yourself with a chocolate speckled white cake. I, however, went the chunky route. It was much more fun to take a bite of the cupcake and find a small chunk of cookie. 

I thought about giving the frosting a layer of Oreo dust as a garnish, but the texture was a bit too similar to sand. I decided to go with the chopped Oreos instead of pulverized Oreos.

My favorite part of the recipe is the half an oreo on the bottom of the cupcake. Trust me on this one, separate the Oreos in half and include only one side on the bottom of the cupcake liner. 

Cookies & Creme Cupcakes
Yields: approx. 2 dozen

Cupcakes:
2 1/2 cups chopped Oreos
2 cups of flour
1 tsp. baking powder
1 2/3 c. sugar
3 egg whites
1/2 c. butter - room temp
2 tsp. vanilla extract
1 c. milk
12 oreo halves

Preheat your oven for 400˚FPut your cupcake liners into the pan and place one Oreo half into each liner. Combine the flour and baking powder together in a bowl and place to the side. Then, cream together the butter and sugar. Add in the egg whites one at a time, mixing well after each addition. Then, mix in the vanilla. 

Add in half of the dry ingredients and beat the batter well. Mix in the milk and add in the rest of the dry ingredients. Then, add the chopped Oreos to the batter being careful not to mix too long. Fill each cupcake liner 2/3 full. After putting the cupcakes into the oven, turn the temperature down to 350˚F and bake for 15-18 minutes or until a toothpick inserted into the center of a cupcake comes out clean. Allow the cupcakes to cool for a few minutes and then remove them from the pan to cool the rest of the way.

Cream Cheese Frosting:
1 block (8 oz.) cream cheese
6 tbsp. butter - room temp
4 c. powdered sugar
1/2 tbsp. vanilla extract
2 tbsp. heavy cream

Blend together the cream cheese, butter, and vanilla until it creates a smooth mixture. Slowly, add in the powdered sugar until just incorporated. Add the heavy cream and beat until it's blended into the mixture. Then, beat the mixture on high for about 5 minutes until it becomes light and fluffy. Once the cupcakes are cool, top them with frosting and garnish with any leftover Oreos. 

Adapted from Annie's Eats.

I prefer my from scratch recipe, but if you're in a bind for time here's my alternate recipe for you.


Easy Peasy Recipe
1 white cake mix + ingredients listed on box
2 1/2 cups of chopped Oreos
1 can of premade frosting
Oreos to garnish


Follow the directions of the cake mix box to mix up the cake batter. Add in the chopped oreos. Scoop into cupcake liners, 2/3 full, and bake as directed on the box. Allow your cupcakes to cool and finish them off with frosting and your Oreo garnish!


Enjoy!

Tuesday, October 19, 2010

Welcome!

Why hello there. It appears you've found the collaborative blog of KatieKay, and Nicole.
Heaven help you.

Okay, so it's not that dramatic. We're actually very excited to share our pretty handmade things and yummy baked goods with the world, adding a little inspiration to boot.

Won't you sip on a cup of tea & join us?
Photo Via
Related Posts Plugin for WordPress, Blogger...